
















Ford F-150 16.2″ Tesla-Style Radio Installation Guide: Keep Factory Controls and Avoid Costly Wiring Mistakes
Ford F-150 Tesla-Style Radio Installation Guide: Wiring, Climate Controls and Compatibility Checks
This Ford F-150 Android radio installation guide explains the documented process for fitting a 16.2-inch Tesla-style vertical screen to a 2015–2020 Ford F-150. It covers dashboard disassembly, original climate-control transfer, wiring-harness identification, retained-function testing, troubleshooting and the vehicle checks required before ordering.
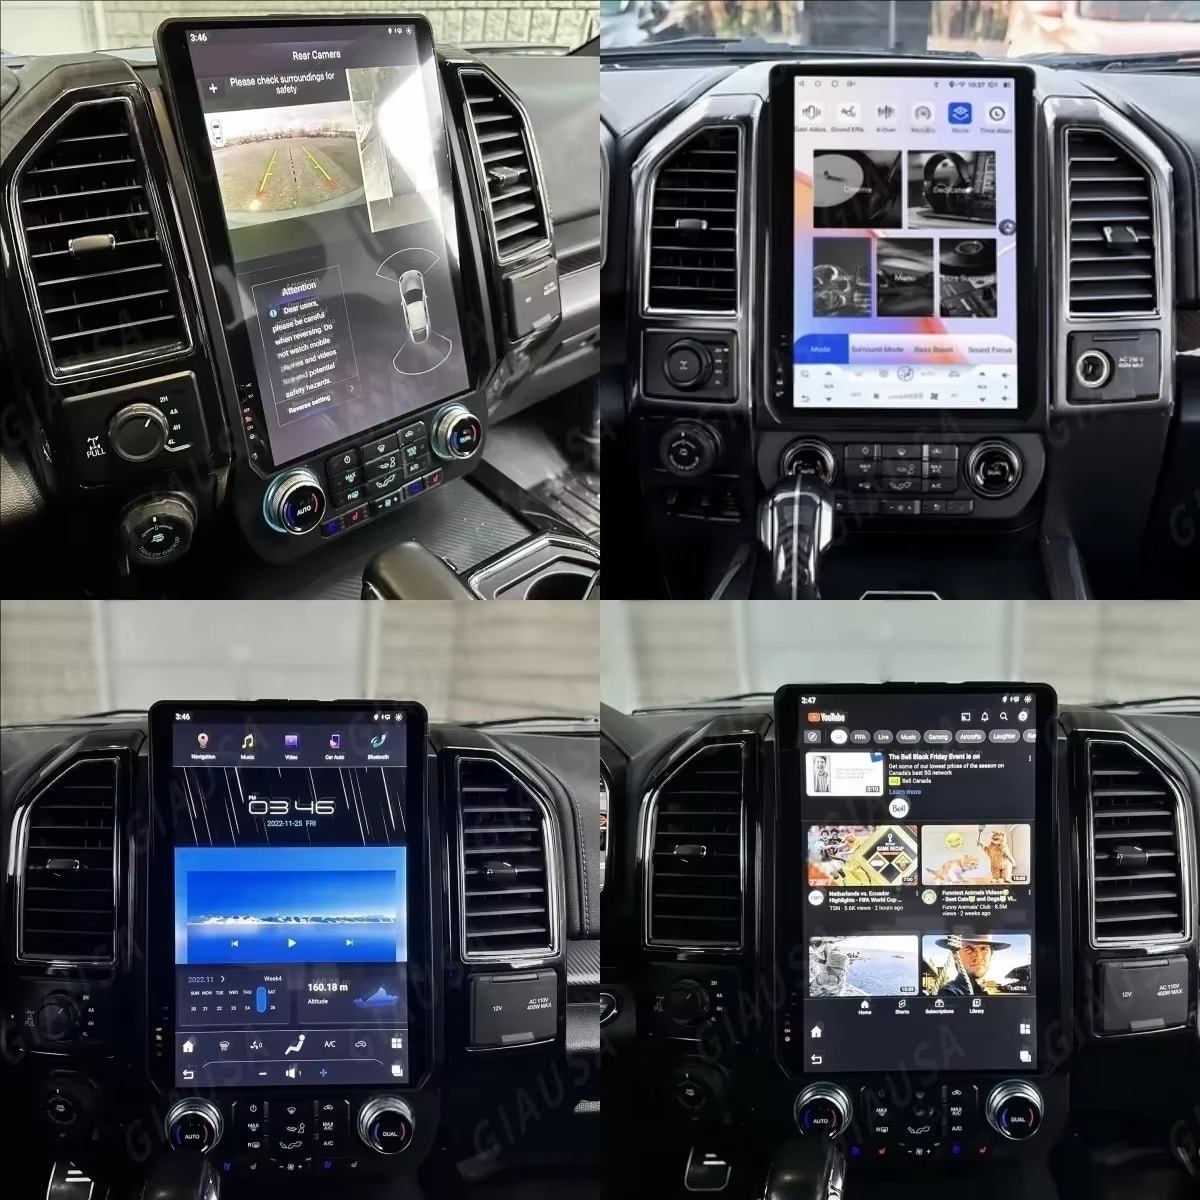
What Does This Ford F-150 Radio Installation Require?
This is not a simple screen attachment. The installation requires controlled dashboard disassembly, transfer of original climate-control hardware, vehicle-specific power and CANBUS connections, camera and audio verification, complete testing and careful reassembly.
Looking for the Correct Ford F-150 Screen?
View iKAGOO Ford Android head units, then submit your dashboard, factory screen, audio-system and camera details before ordering. This reduces the risk of receiving the wrong fascia, harness, CANBUS interface or camera solution.
Confirm the Original Ford F-150 Configuration First
“2015–2020 Ford F-150” is an initial vehicle range, not a completed compatibility result. SYNC version, factory audio, camera system, climate panel and connector layout can change the required product configuration.
Photos and Details to Submit
- Complete center-dashboard photo
- Original display switched on
- SYNC or system-information screen
- Complete climate-control panel
- Hazard, ESC and camera switches
- Original audio branding or amplifier type
- Rear-camera or 360-camera display
- Vehicle year, trim and steering position
Stop and Recheck If
- A connector shape or locking key differs
- The pin count does not match
- A trim panel bends instead of releasing
- The climate board does not align naturally
- Cutting, soldering or repinning appears necessary
- A factory function disappears
- A new warning light appears
- The screen cannot sit flush without force
Prepare the Work Area Before Removing the Dashboard
Release trim clips while reducing the risk of scratching or marking the dashboard.
Used for the documented center-stack and factory-radio fasteners.
Helps remove climate-control hardware and small retaining screws.
Protects the center console, dashboard trim and removed control panels.
Keeps original screws, clips and small modules organised by installation step.
Photograph every original connector and cable route before disconnection.
Step-by-Step Ford F-150 Tesla-Style Radio Installation
Keep the installation reversible. Photograph connectors before disconnection, keep original screws and clips organised, and never use force to compensate for a mismatched part.
iKAGOO Installation Logic
Installation is not complete just because the screen powers on. Original controls, audio, cameras, CANBUS communication, warning status and all expected retained functions must be tested.
- Photograph connectors first
- Group hardware by step
- Never force trim or plugs
- Test before final closure
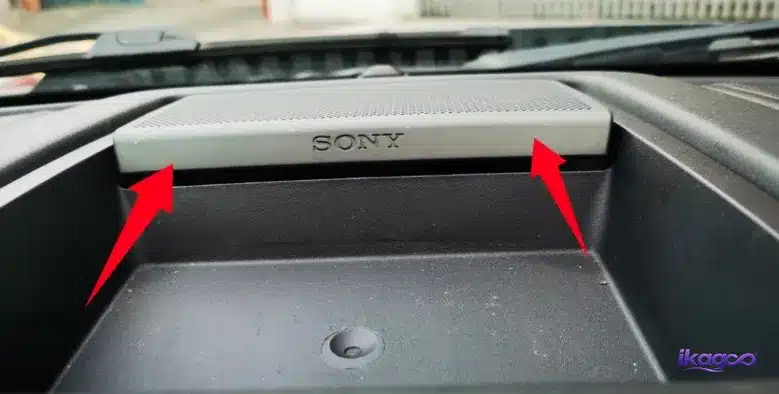
Remove the Upper Speaker Grille and Speaker Assembly
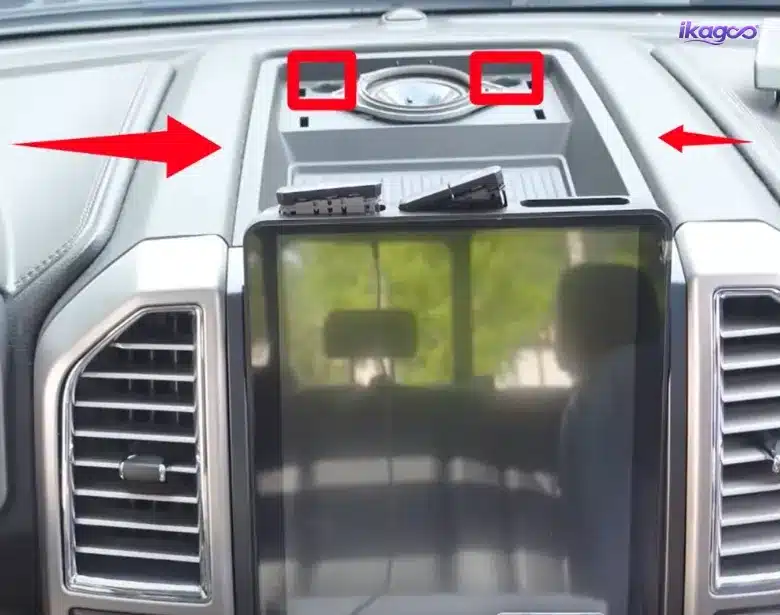
Start at the upper dashboard to expose the first center-stack fasteners.
Use a plastic trim tool to release the upper grille without damaging the dashboard. Remove the exposed fasteners and lift the speaker assembly carefully without pulling on its wiring.
A visible Sony mark records the original audio configuration. It does not indicate a partnership or endorsement between Sony and iKAGOO.
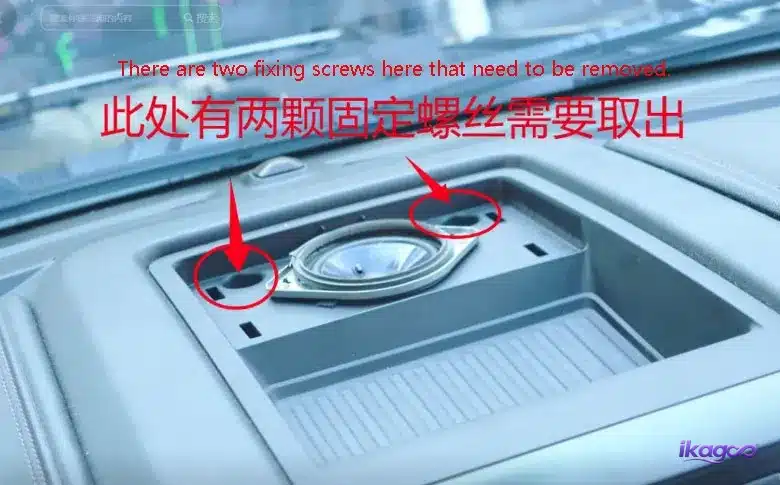
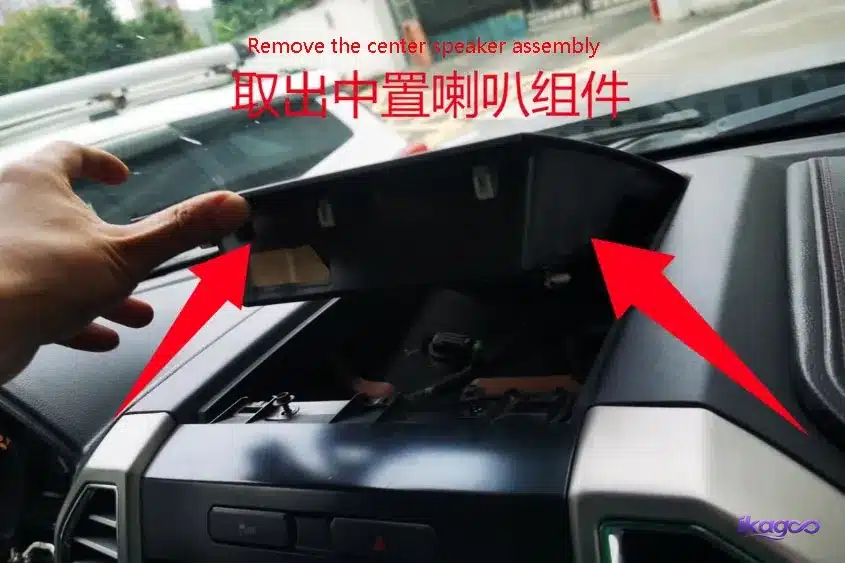
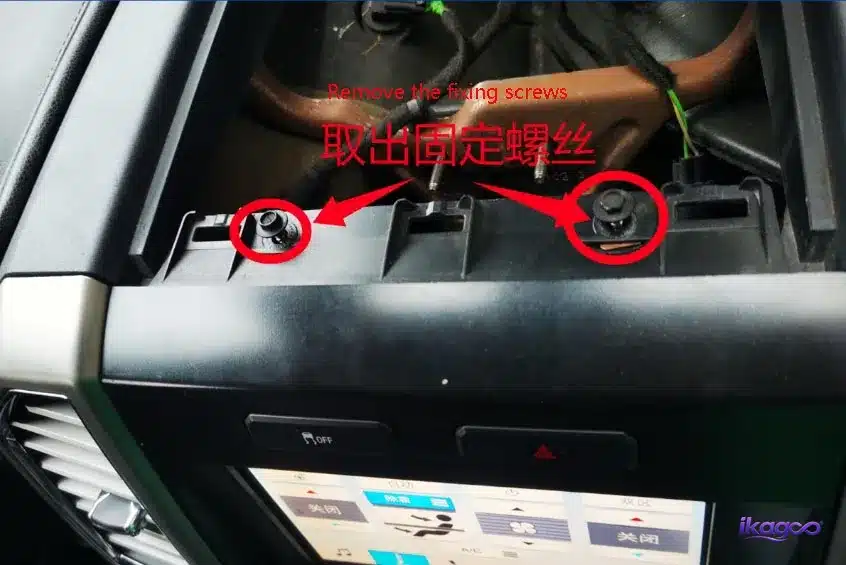
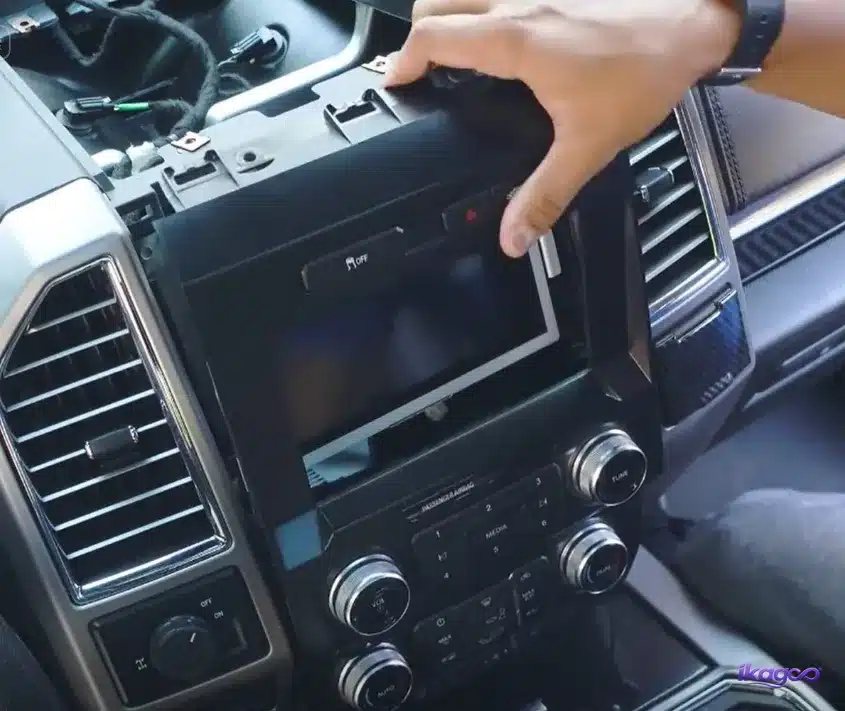
Remove the Center-Stack Fasteners and Main Panel
Remove every retaining screw before releasing the center-panel clips.
Use a 7 mm socket for the documented fasteners. Support the panel as the clips release and do not allow it to hang from connected wiring.
Disconnect the Switch and Climate-Control Connectors
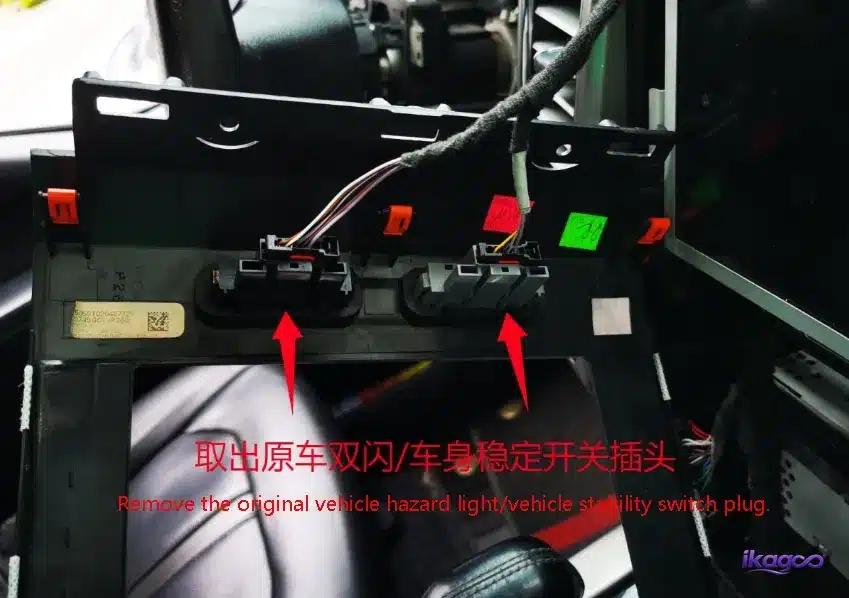
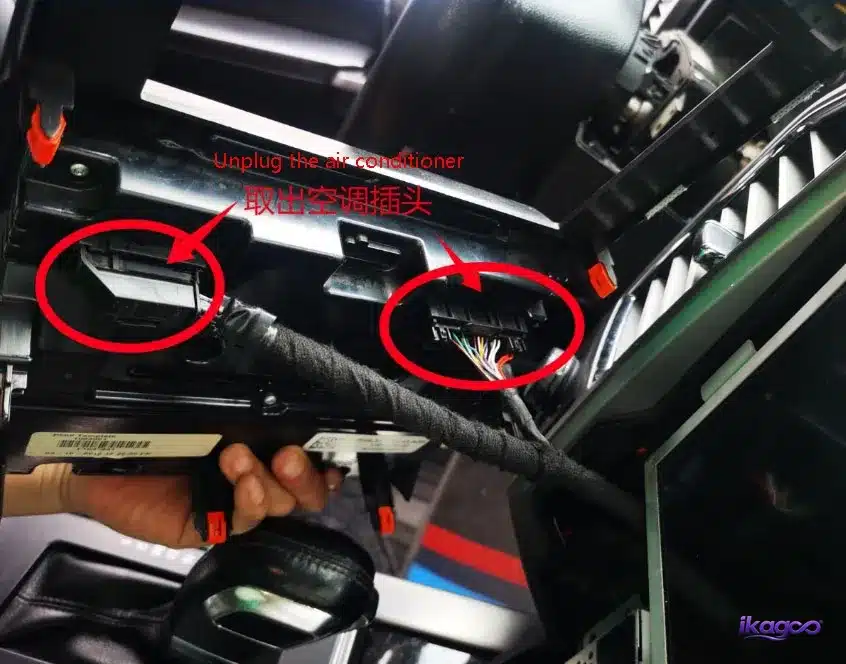
Photograph each connector position and locking-tab direction before unplugging it.
Disconnect the hazard and ESC switch connector, followed by the climate-control connector. Pull from the connector housing, never from the wires.
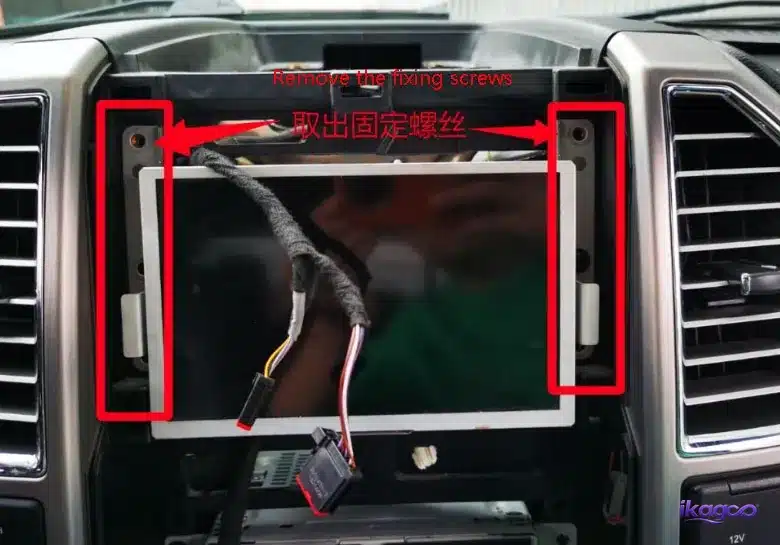
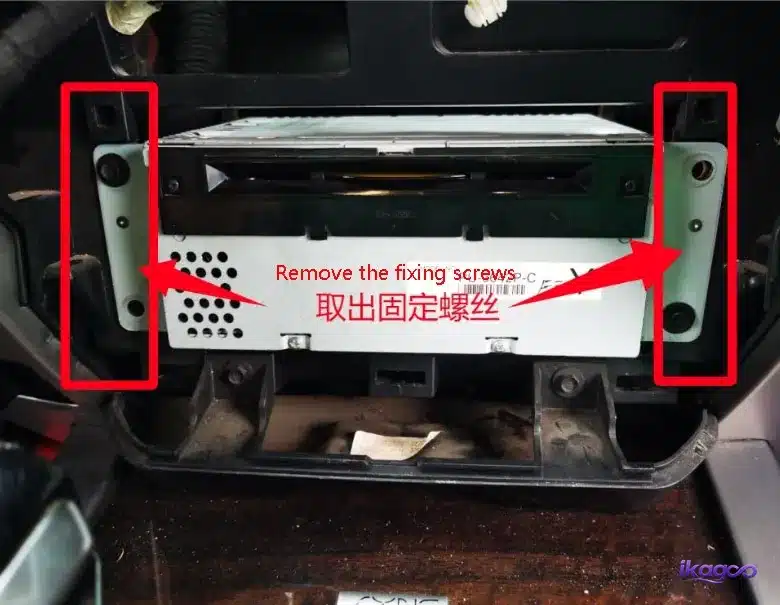
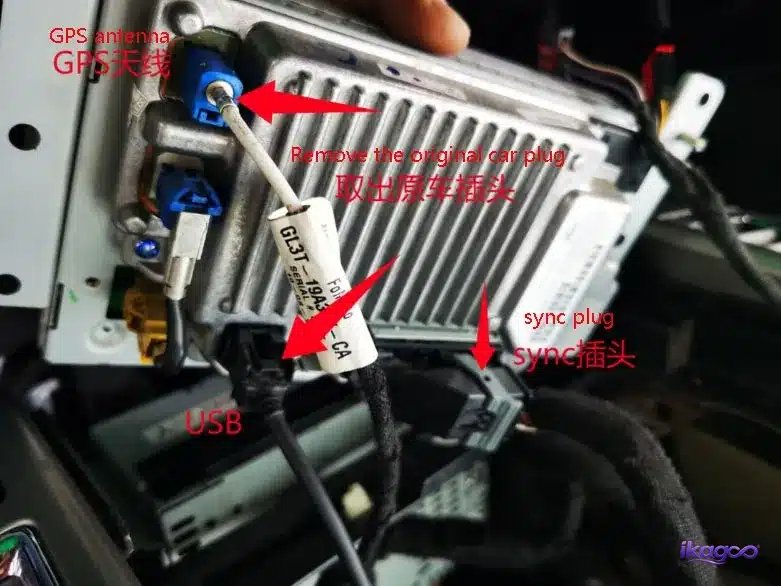
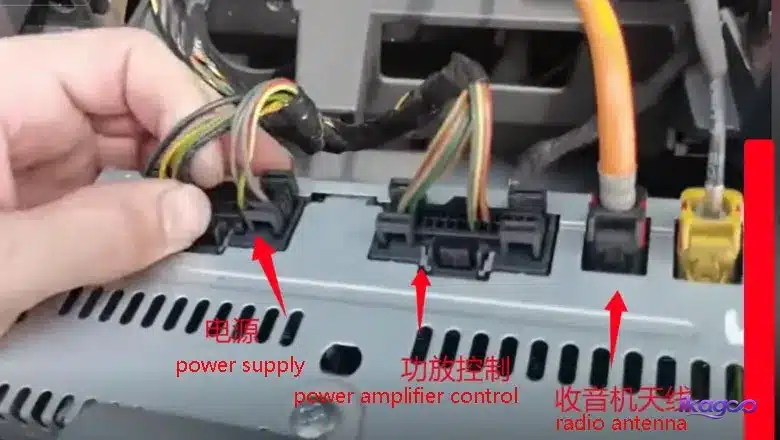
Remove the Factory Display and Identify Every Connector
Match connectors by shape, pin count, locking design and vehicle configuration—not by wire colour alone.
Remove the factory display and radio mounting screws while supporting the assembly. Photograph the complete connector group before disconnection.
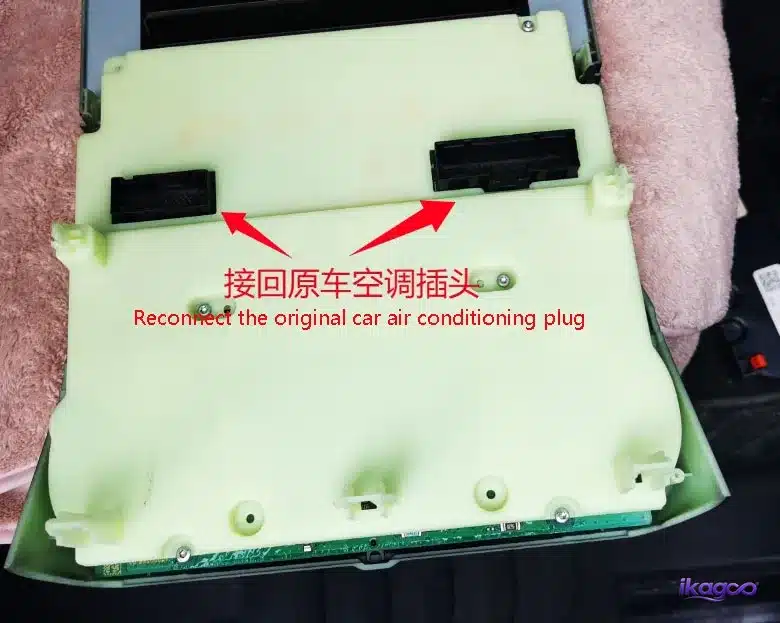
Transfer the Original Climate-Control Hardware
In the documented 2016 installation, the original climate controls are transferred into the new fascia.
Place the original panel on a protected surface. Remove the retaining screws, lift the board carefully and transfer the original buttons and control hardware into the new housing.
Every component should align naturally. Do not use the screws to pull a misaligned control board into position.
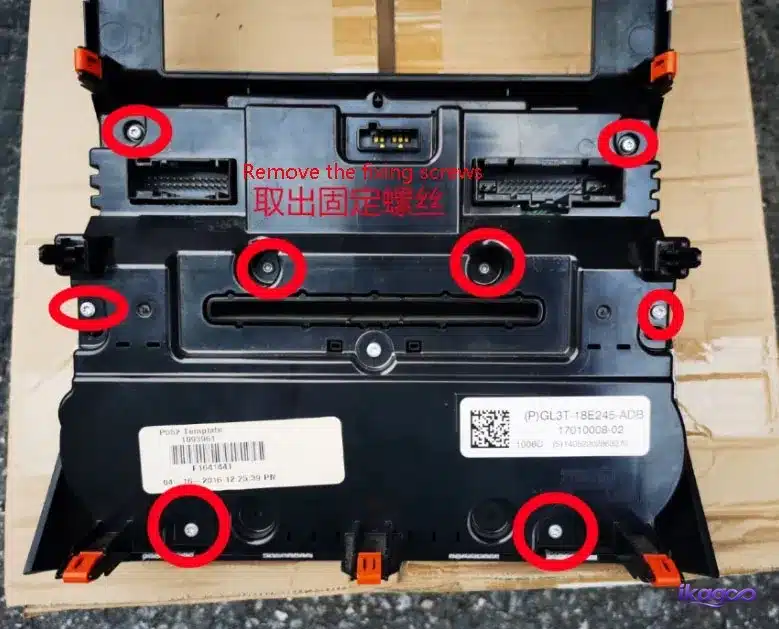
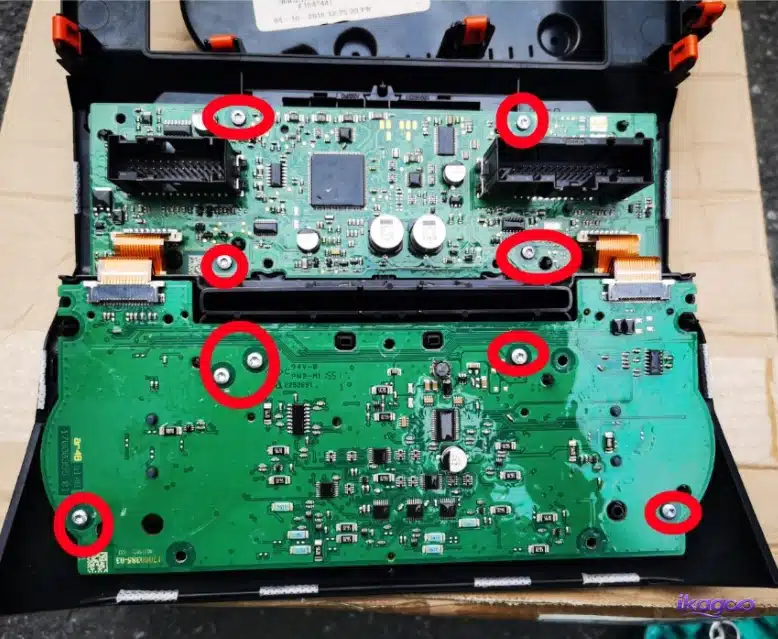
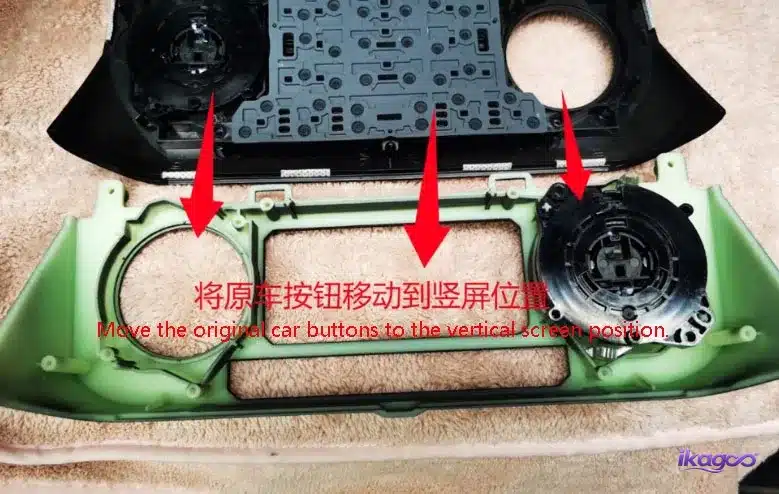
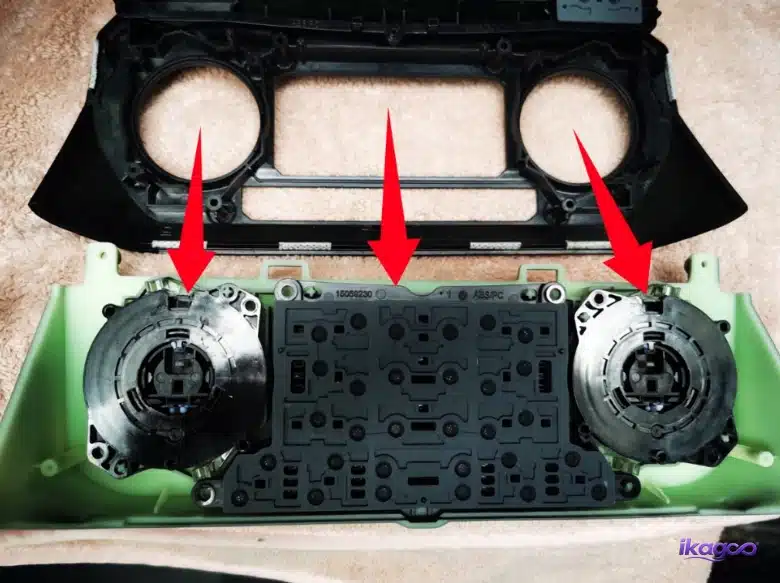
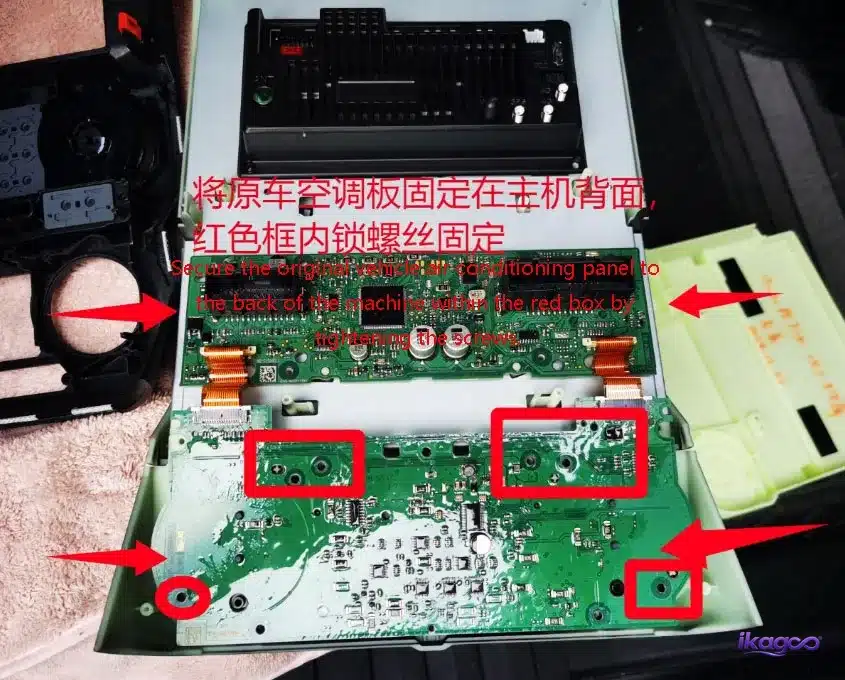
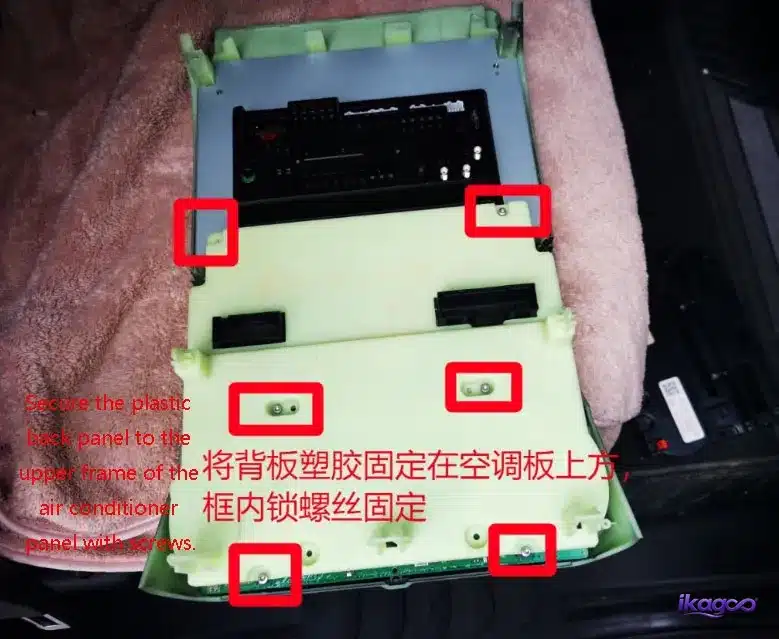
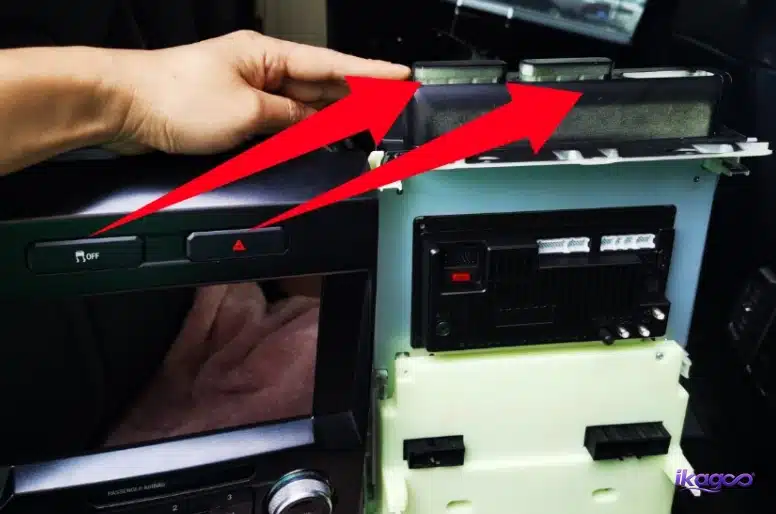
Transfer the Factory Clips and Position the Rear Support
Incorrect clip placement can cause panel gaps, unstable trim and dashboard rattles.
Transfer each required factory clip to its matching position on the new fascia. Compare the original and replacement assemblies before positioning the rear support.
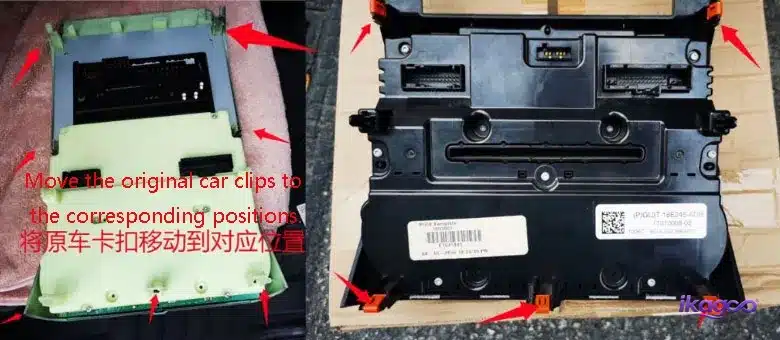
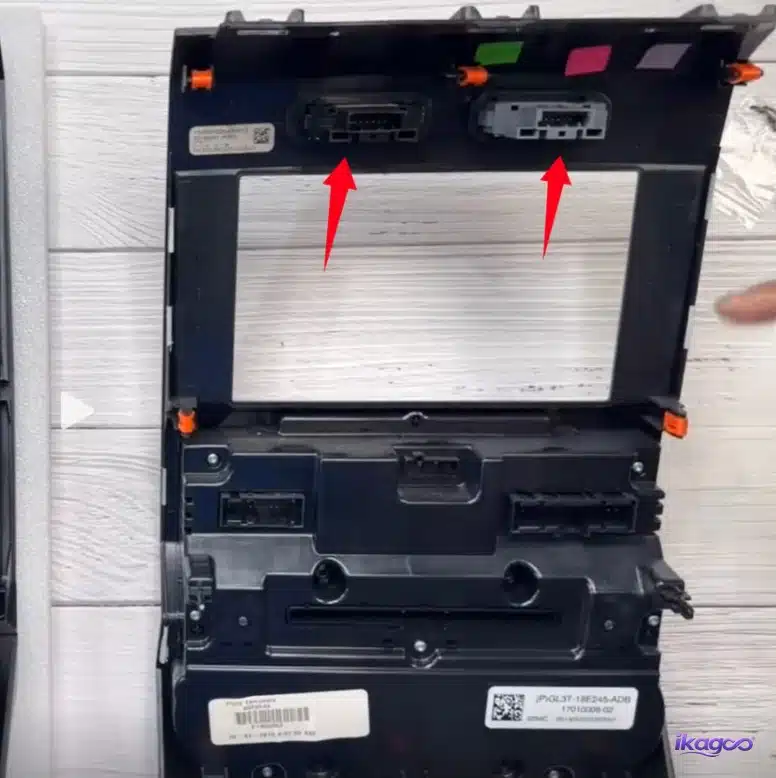
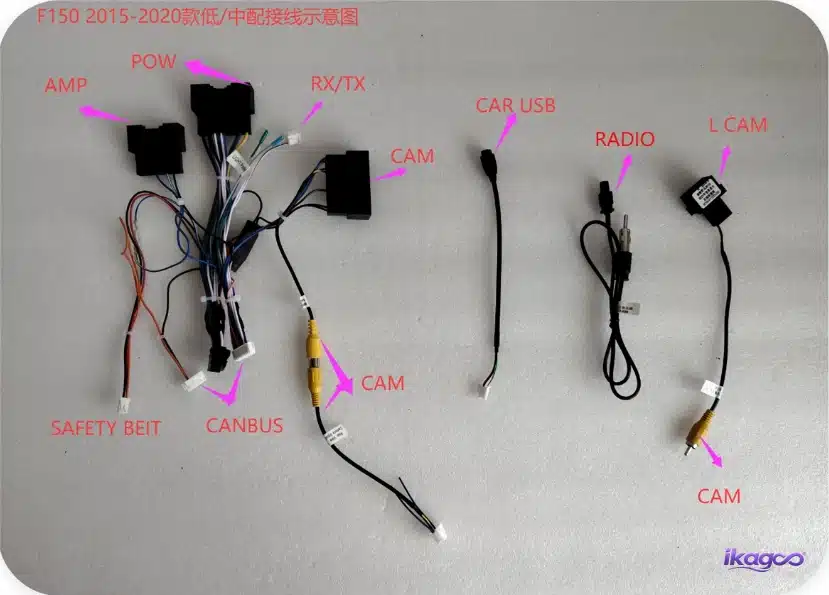
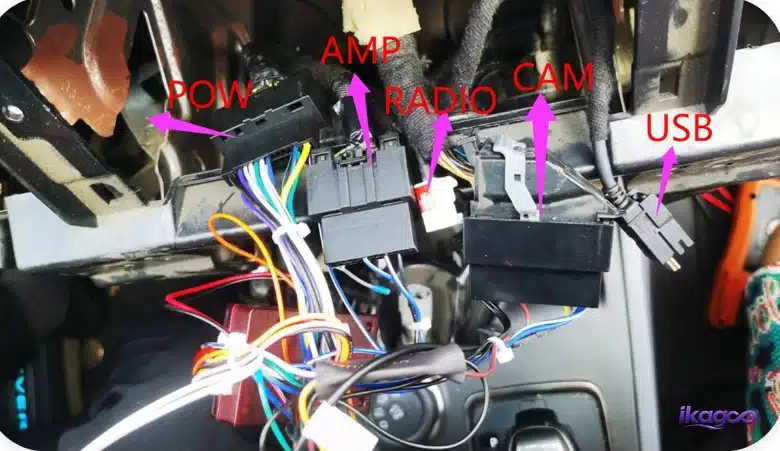
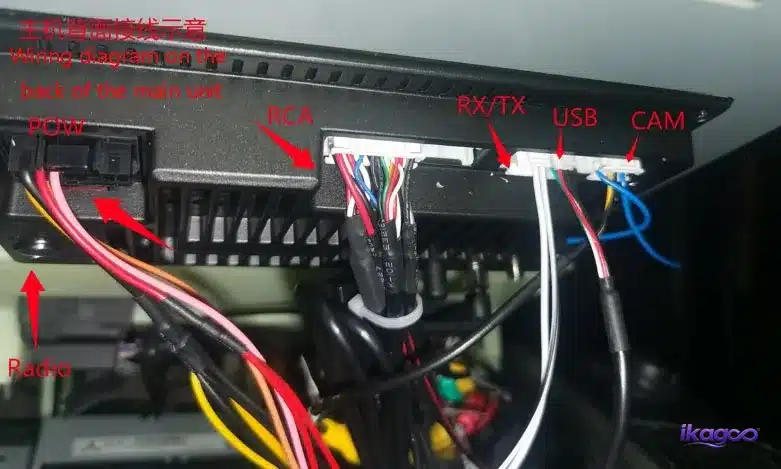
Identify Power, CANBUS, USB, Camera and Audio Connections
A connector being present does not prove that every function is supported on every Ford F-150.
Review the supplied harness reference before applying power. Confirm the main power, CANBUS, USB, camera, audio and amplifier interfaces against the actual truck configuration.
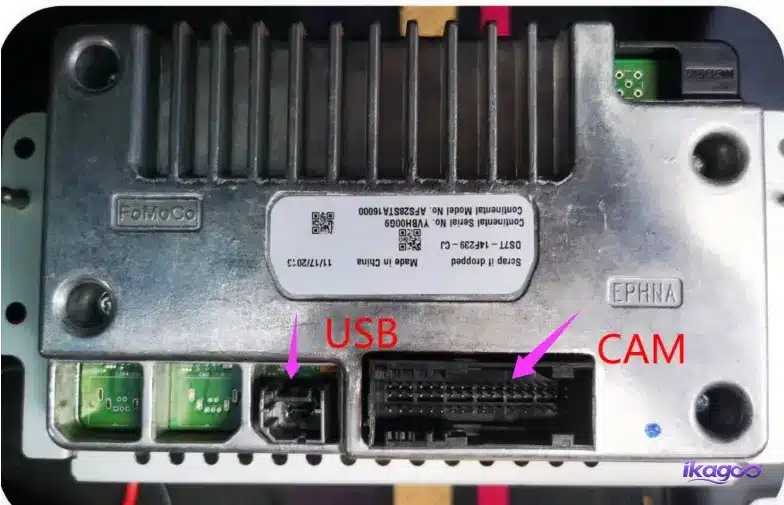
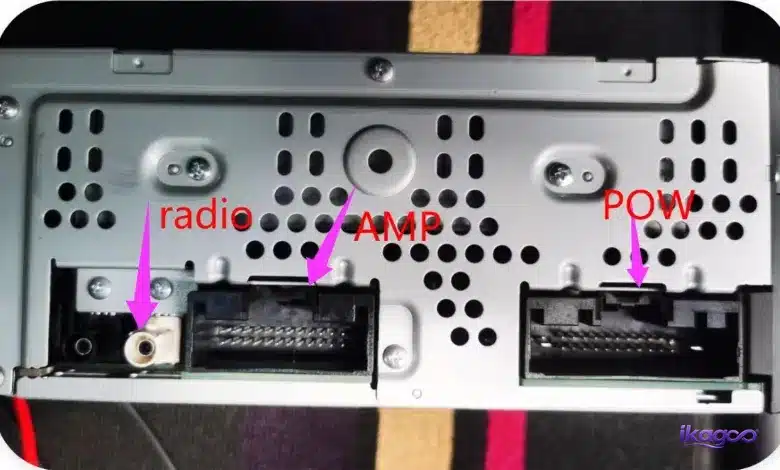
Connect and Route the Vehicle-Specific Harness
Connect one plug at a time and confirm every locking tab before moving to the next connection.
Route the harness away from sharp edges, screw holes, air ducts and areas that could prevent the new screen from sitting flush.
Reconnect the Controls and Seat the Vertical Screen
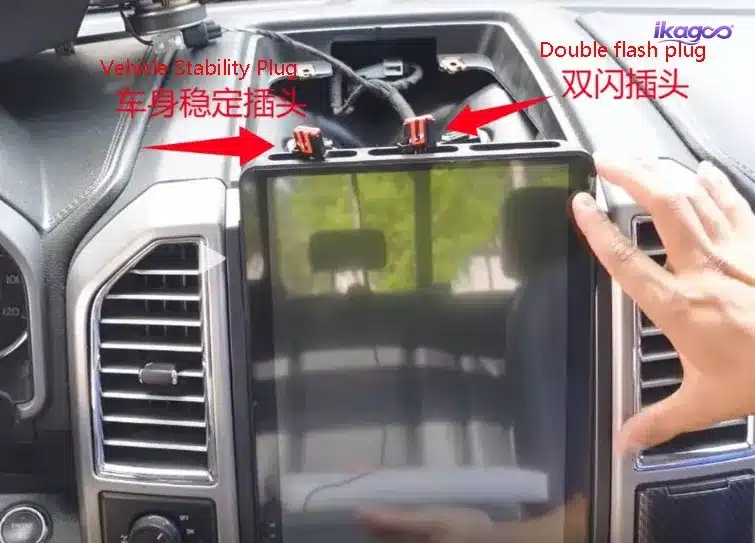
Do not force the display into position over trapped wiring or an incorrectly positioned support.
Reconnect the climate and switch connectors, position the completed display assembly and guide the rear wiring into the available dashboard space.
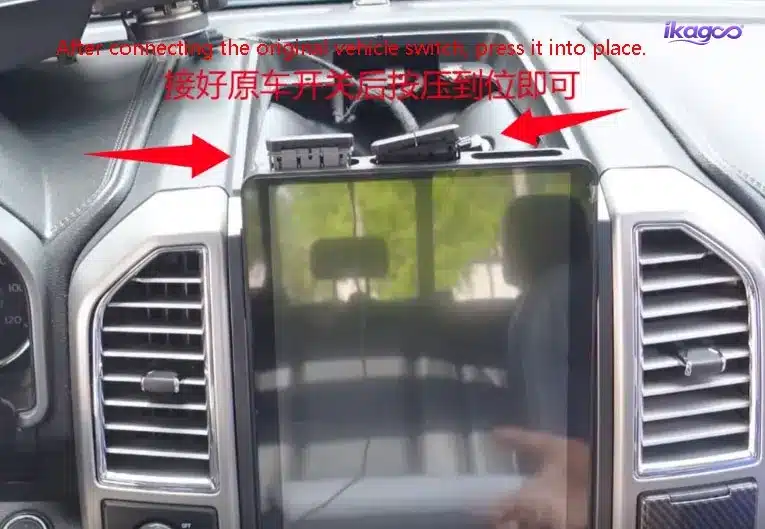
Test Every Function Before Final Closure
A display that powers on is not proof that the installation is complete.
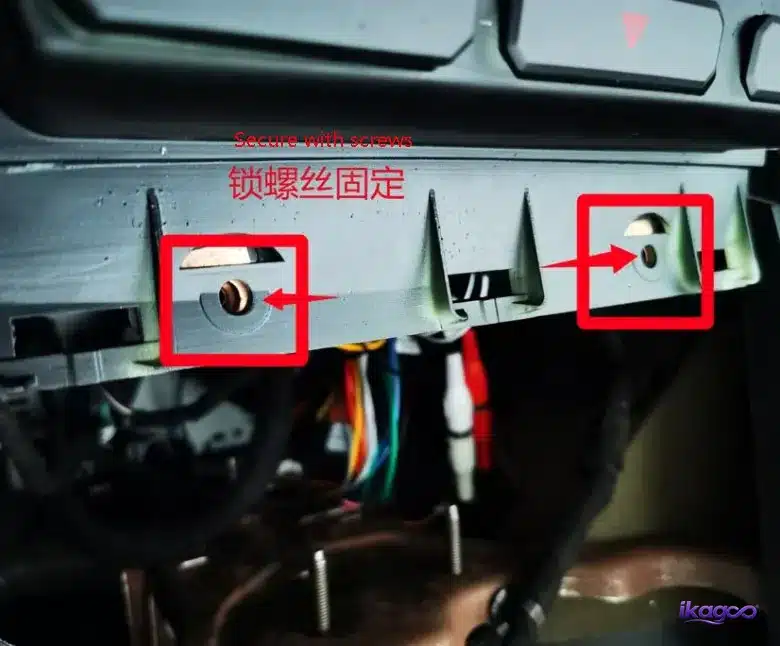
Test the display, touch response, sound, climate controls, hazard switch, ESC switch, steering-wheel controls, camera, amplifier, USB, Bluetooth, CarPlay or Android Auto where supplied, and every other expected retained function before reinstalling the final screws and upper grille.
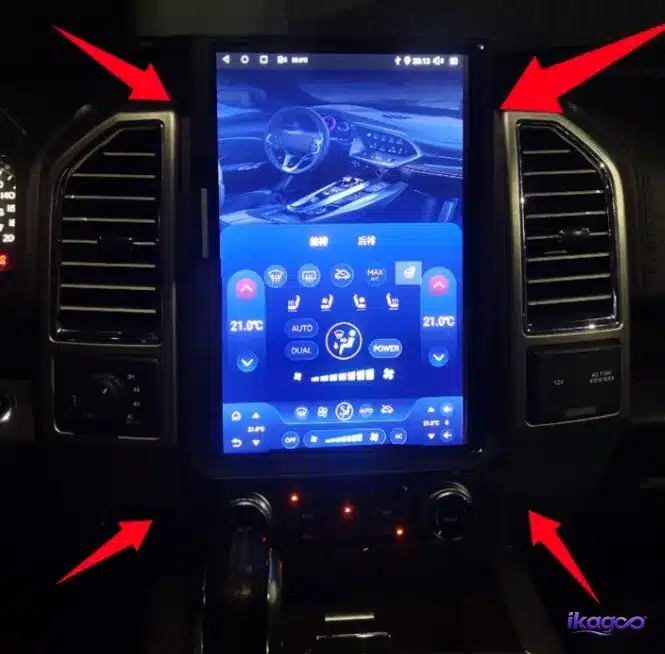
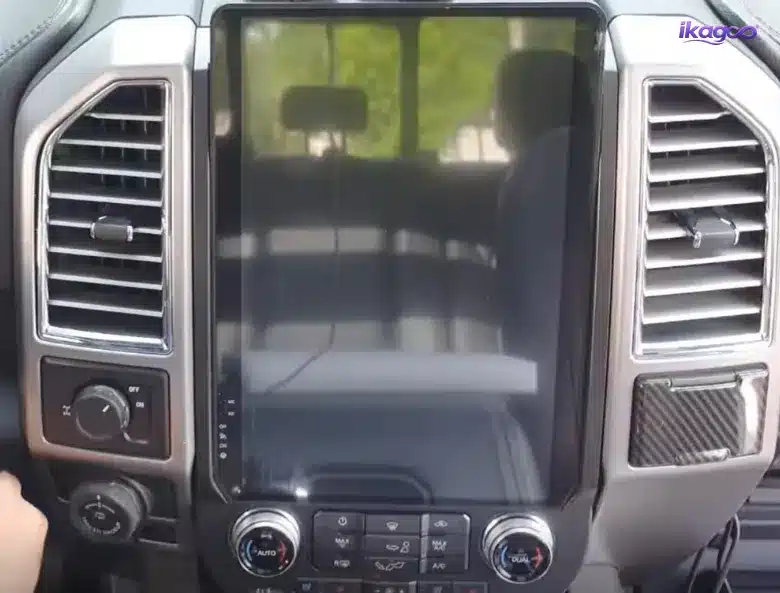
What Must Work Before the Final Trim Is Reinstalled?
Screen, Audio and Connectivity
- Normal startup, shutdown and sleep
- Touch response across the full display
- Sound from all expected channels
- Normal volume and balance response
- Bluetooth calls and audio
- CarPlay and Android Auto where supplied
- No repeated restarting
Kontrol Asli
- Temperature adjustment
- Fan speed and air direction
- Front and rear defrost
- Hazard and ESC switches
- Kontrol setir
- Transferred buttons move freely
Integrasi Kendaraan
- Rear camera when confirmed
- 360-degree camera when equipped and confirmed
- Factory amplifier response
- Original USB when supported
- No new warning lights
- Screen enters sleep after locking
Ford F-150 Android Radio Troubleshooting After Installation
Troubleshooting should begin with the confirmed vehicle configuration, harness version and connector layout. Do not cut or bridge wires to compensate for an unidentified fault.
| Masalah | First Checks | What Not to Do |
|---|---|---|
| Screen does not power on | Main harness lock, power connector, CANBUS interface, fuse and confirmed vehicle profile. | Do not bridge or cut wires without the correct diagram. |
| No sound | Factory amplifier type, amplifier adapter, audio outputs, CANBUS settings and harness connection. | Do not assume an amplified Sony system uses the base audio harness. |
| Camera does not display | Camera type, adapter, decoder, trigger setting, video format and image input. | Do not treat an original rear camera and a 360-degree camera as identical systems. |
| Climate controls do not respond | Original climate connector, control-board seating, button alignment and transferred hardware. | Do not close the dashboard until every climate function works. |
| Steering-wheel controls do not work | CANBUS connection, confirmed vehicle profile and control settings. | Do not modify unrelated factory wiring. |
| Screen repeatedly restarts | Main power connection, ACC signal, CANBUS profile, attached USB devices and system configuration. | Do not continue final assembly while the unit is unstable. |
| Wireless CarPlay does not connect | Bluetooth pairing, Wi-Fi connection, previous phone pairings, CarPlay application and phone permissions. | Do not reset unrelated vehicle modules before checking the phone and head-unit connection. |
| Original USB port does not work | USB-retention adapter, original USB version, connection to the new unit and data-versus-charging support. | Do not assume every original USB port is retained by every harness version. |
| Display will not sit flush | Harness routing, rear support, clips, connectors and trapped cables. | Do not force the fascia into position. |
| Possible battery drain | Verify sleep mode, CANBUS profile, ACC signal, connected accessories and whether the display remains active after locking. | Do not leave the condition unresolved or assume it is normal. |
| A new warning light appears | Stop, switch off and recheck every disconnected factory module and connector. | Do not continue driving until the cause is identified. |
Is This Ford F-150 Upgrade Worth Buying, Compatible and Practical to Install?
The three standards answer separate buyer questions: whether the upgrade provides enough daily-use value, whether the actual truck can retain its required functions and what level of installation skill is realistically required.
Recommended for Long-Term Owners
The 16.2-inch vertical display creates a substantial interface and cockpit change for owners who want a larger modern system and intend to keep the truck.
- Major modernization of the center stack
- Larger interface for frequently used functions
- Strong value for long-term ownership
- Original climate hardware retained in the documented route
- Integrated vertical-screen cockpit appearance
- The work is L4 and is not a basic screen swap
- Fitment depends on the original configuration
- Audio, amplifier and camera support require confirmation
- Owners satisfied with the factory system may not need it
Minimum Recommendation Threshold: 95/100
A vehicle-specific final score cannot be issued from the model year alone. The actual screen, controls, amplifier, camera and connector configuration must be reviewed first.
- Factory climate controls
- Kontrol setir
- SYNC system and original interface
- Factory amplifier and audio system
- Rear camera or 360-degree camera
- Original USB and vehicle settings
- No new warning lights after installation
Disarankan untuk dilakukan pemasangan oleh tenaga profesional
This advanced installation involves multi-stage dashboard disassembly, original-control transfer, vehicle-specific harness identification and complete retained-function testing.
- Upper dashboard and center-stack trim removal
- Factory display and radio disconnection
- Original climate-control hardware transfer
- Factory clip and support repositioning
- Power, CANBUS, camera and audio identification
- Complete retained-function testing
- A connector or pin layout differs
- Cutting or repinning appears necessary
- The climate board does not align
- The screen cannot sit flush naturally
- A factory function disappears
- A new warning appears
The Product Version and Support Route Matter as Much as the Screen Size
A large screen alone does not confirm a successful upgrade. The correct fascia, climate-control route, harness, CANBUS interface, amplifier solution and camera configuration must match the actual truck.
Vehicle Review Before Ordering
The dashboard, original system, audio and camera details are reviewed before a product route is recommended.
Matched Hardware and Guidance
Installation guidance should correspond to the confirmed screen, harness, CANBUS and original Ford configuration.
After-Sales Responsibility
Troubleshooting, order records, warranty review and continued support form part of the product value.
Ready to Choose a Ford F-150 Android Head Unit?
Browse the Ford product range, then submit your original dashboard and system details so iKAGOO can review the correct purchase route before shipment.
Ford F-150 Tesla-Style Radio Installation FAQ
Continue Your Ford F-150 Upgrade Research
Find the Right Ford F-150 Android Head Unit and Confirm It Before You Buy
Do not choose only by screen size or model year. Review the Ford product range, then submit your truck’s dashboard, SYNC system, climate controls, factory audio and camera configuration so the purchase route can be checked.
Start with products listed in the Ford Android Head Units category.
Dashboard, original screen, audio, camera and controls are reviewed before recommendation.
Support is based on the confirmed product version and actual vehicle configuration.





Add comment